Flywheel Tutorial
Learn how to install Flywheel, connect MCP hosts, use the Web UI, and work with research graphs.
Note: We are constantly iterating, so some aspects of this tutorial may be stale.
Welcome to Flywheel. Below we will cover how to install Flywheel and some tips on usage patterns.
What is Flywheel?
Flywheel's ambition is to serve as the infrastructure upon which autonomous science will run.
In its current iteration, you can think of Flywheel as "git for research", to aid researchers and agents in working on research projects.
While in SWE we use git to manage changes to code, in research we are interested in manipulating ideas. Flywheel provides the DAG structure and operations (branching, merging, etc) to manage this.
Setting up Flywheel
We are in the business of automating science. The canonical local Flywheel
install gives you the flywheel CLI and bundled agent skills. You can then
optionally wire Flywheel into compatible hosts through the
Model Context Protocol (MCP).
MCP enables compatible hosts to call Flywheel tools natively. We recommend using Flywheel with Codex or Claude code, but any compatible MCP host should work.
One-command setup (recommended)
Simply run:
curl -fsSL https://flywheel.paradigma.inc/install | shThis installs the flywheel CLI into the managed user prefix
${FLYWHEEL_INSTALL_PREFIX:-$HOME/.local}, configures PATH when needed, and
starts guided setup. In an interactive terminal, setup asks whether you want MCP
host setup or CLI-only setup. See Install modes below for the
CLI and MCP options.
On Windows, first choose the environment that launches your AI coding host. If you use Codex, Claude Code, Cursor, or another host from WSL, open that WSL distro, install Node.js 20+ and npm inside WSL, and run the Linux installer there. If your host runs as a native Windows process, use the native PowerShell recipe on the Install page.
To install directly into MCP mode instead, pass setup arguments through the installer:
curl -fsSL https://flywheel.paradigma.inc/install | sh -s -- --mode mcpIf you are on a remote shell (for example SSH into a server), use device auth:
curl -fsSL https://flywheel.paradigma.inc/install | sh -s -- \
  --mode mcp \
  --auth-mode device \
  --base-url https://flywheel.paradigma.inc
Use the public Flywheel origin (flywheel.paradigma.inc) for --base-url, not
backend Fly hostnames. Device auth prints an approval URL and setup code; if
browser auth does not open from WSL or a remote shell, copy both values into
the browser you use to approve setup.
Reinstall / cleanup
curl -fsSL https://flywheel.paradigma.inc/uninstall | sh
curl -fsSL https://flywheel.paradigma.inc/install | sh
The uninstall script removes Flywheel MCP entries, bundled skills, the managed-prefix CLI package and binary, installer-owned PATH block, default CLI config/profiles, and the local runtime cache. It does not delete remote Flywheel account data, nodes, artifacts, billing data, GitHub connections, or other remote resources. Re-running the install script afterwards starts from a clean guided local state.
To reinstall into MCP mode after cleanup, pass --mode mcp through the install
script:
curl -fsSL https://flywheel.paradigma.inc/install | sh -s -- --mode mcpWeb connector hosts (ChatGPT.com / Claude.ai / etc. )
Web connector hosts can still use OAuth-style connector flows. Keep using those
host-native connector install UIs for ChatGPT.com custom apps, Claude.ai custom
connectors, etc. Simply put https://flywheel.paradigma.inc/mcp-server as the
URL when prompted.
Install modes
setup has two install modes. CLI mode is the canonical local install; MCP mode
is optional host wiring for agents that should call Flywheel tools natively.
CLI mode
npx --yes @paradigma-inc/flywheel setup --mode cli--mode cli installs the bundled Flywheel skills and configures runtime
credentials/config for the flywheel binary. No MCP host config is written.
Your agent then talks to Flywheel by shelling out to the flywheel binary;
the bundled skills route to the matching CLI command for each operation.
Prerequisite for bare flywheel <command> routing after CLI-mode setup: install
the binary through the curl installer or the managed-prefix npm recipe.
curl -fsSL https://flywheel.paradigma.inc/install | sh -s -- --mode cliPick this when you do not want to wire MCP into your host config, or when your agent prefers shelling out to a CLI over calling MCP tools.
MCP mode
npx --yes @paradigma-inc/flywheel setup --mode mcp--mode mcp wires Flywheel MCP into your host's config and installs the bundled
Flywheel skills. Your agent then talks to Flywheel through your MCP host,
calling flywheel_* MCP tools.
Pick this when your host (Codex, Claude Code, Cursor, OpenCode, Gemini CLI, Pi, Hermes Agent, OpenClaw) supports MCP and you want native MCP-tool integration.
Run flywheel commands directly
In either mode, you can also type flywheel commands yourself. For
occasional use:
npx --yes @paradigma-inc/flywheel <command>For regular use, install the binary so flywheel is on your PATH:
curl -fsSL https://flywheel.paradigma.inc/install | sh -s -- --mode cli
FLYWHEEL_BIN="${FLYWHEEL_INSTALL_PREFIX:-$HOME/.local}/bin/flywheel"
"$FLYWHEEL_BIN" help                 # list all commands
"$FLYWHEEL_BIN" help <command>       # per-command usage, examples, and JSON schema
"$FLYWHEEL_BIN" auth:status          # confirm the runtime is authenticated
"$FLYWHEEL_BIN" nodes:list --page 1  # read example
Open a new shell, or source the profile file named by the installer, before
using the bare flywheel command.
See the CLI reference for the full command catalog grouped by
capability area, the setup / uninstall flag matrix, and runtime config
resolution.
What to do with Flywheel?
In our experience the best way to get an answer to this question is to ask it to your MCP host:
$ codex "tell me about flywheel, what can i do with it?"

In this workspace, Flywheel is a node-based system for organizing and executing
work (especially research/experiments) with reproducibility and auditability
built in.

What you can do with it:

- Create work nodes and classify them as insight (thinking/analysis) or empirical (actual experiments).
- Build a graph of work with branching/merging, not just a linear log.
- Commit outcomes with required structure (kind, outcome, summary) so results stay consistent.
- Launch managed compute for a node with budget controls and track execution state.
- Attach artifacts to nodes (text, tables, JSON, images, HTML/plots, checkpoints, diffs).
- Configure hooks to call external HTTP endpoints when node events occur.
- Collaborate with others by sharing nodes/graphs.
- Tag nodes, audit changes, and export summaries/PDFs/subgraphs.

Typical use cases:

- Experiment tracking with hypotheses + evidence.
- Decision logs and technical investigations.
- Team-shared research graphs with reproducible outputs.
- Converting a messy exploration into a reviewable, auditable record.

If you want, I can walk you through creating your first node and a minimal workflow for your current project.
Francesco is documenting some example workflows on his X profile, like organizing, exploring and iterating on a research topic or reproducing papers on a budget.
We'll be sharing more example workflows there and also through our Discord, where we do weekly office hours. You should join!
The Flywheel Web UI
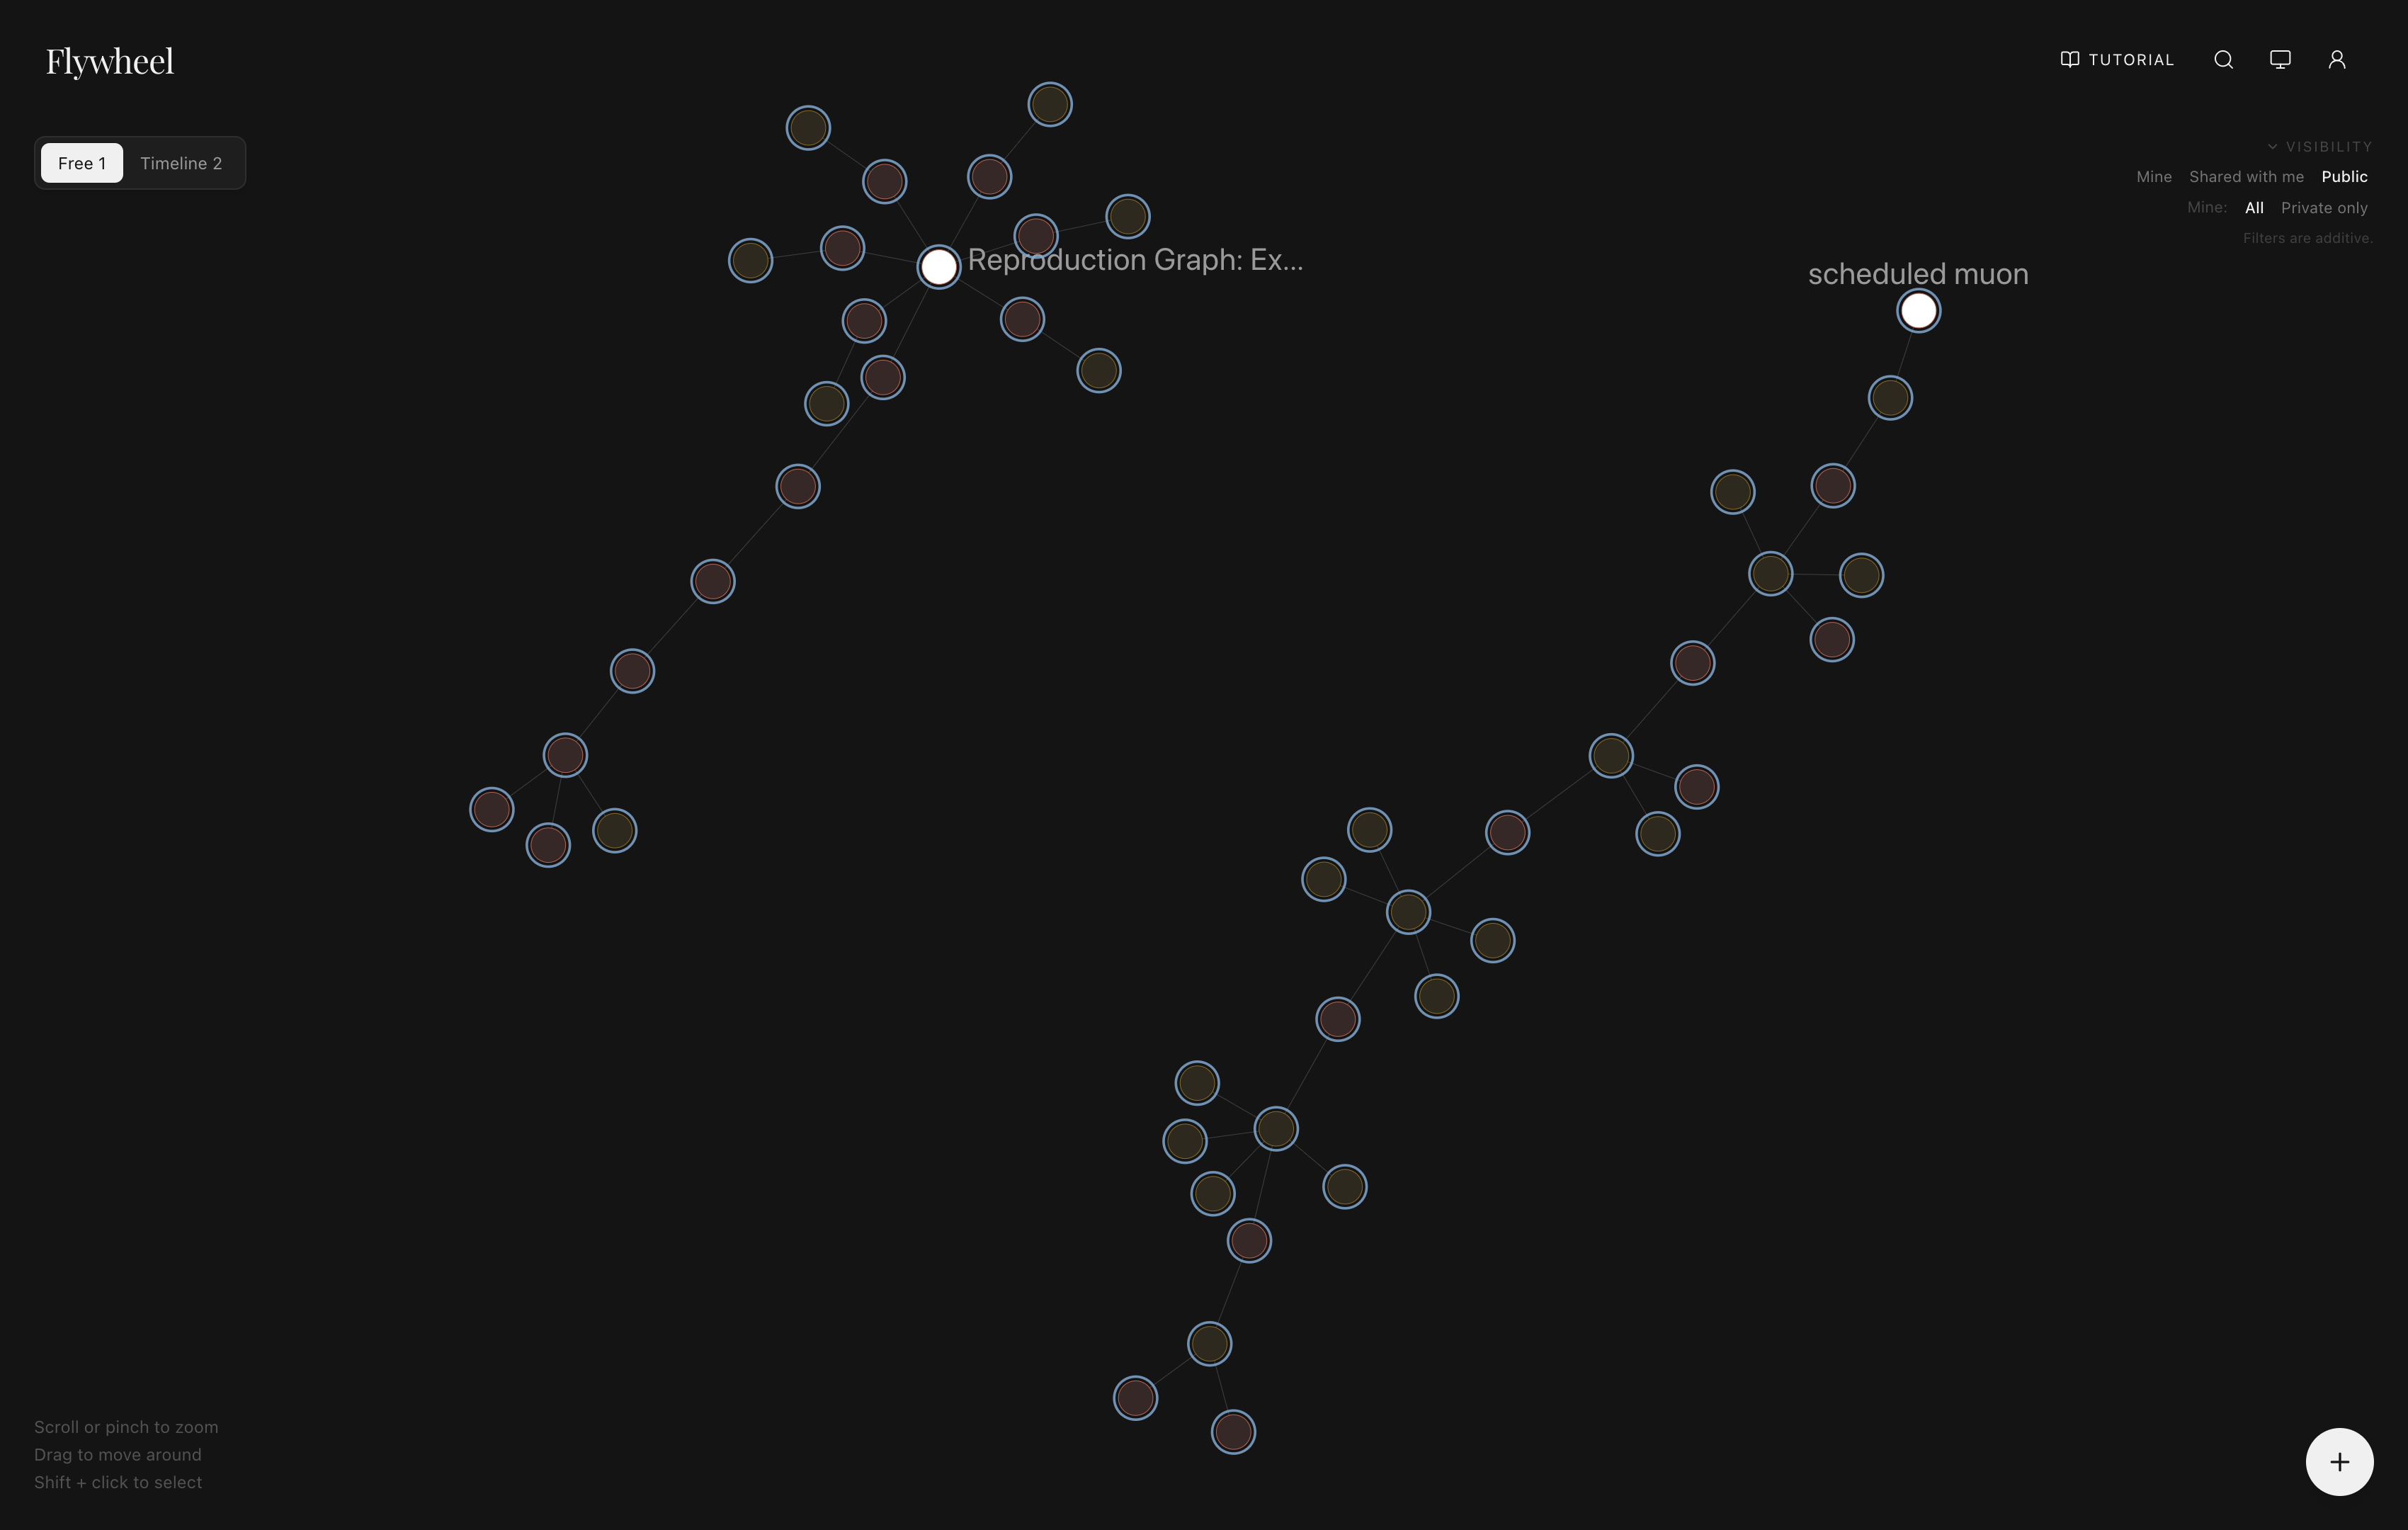
While most of your write-driven interactions with Flywheel will likely be through your MCP host, you will find the Flywheel Web UI useful for visualizing your graph and managing nodes, settings, and account workflows.
The Flywheel Web UI presents itself as a "Canvas" where the directed acyclic graph of nodes is visualized. Initially this graph will be empty, but gets populated as you create nodes through your MCP host. With the top right visibility dropdown, you can also view graphs that have been shared with you or have been made public. You can drag the nodes around to organize them, hover over them to preview their content and click on them for more details. You can pan and zoom around the canvas.
You can also toggle timeline view for a more organized, linear view of the graphs:
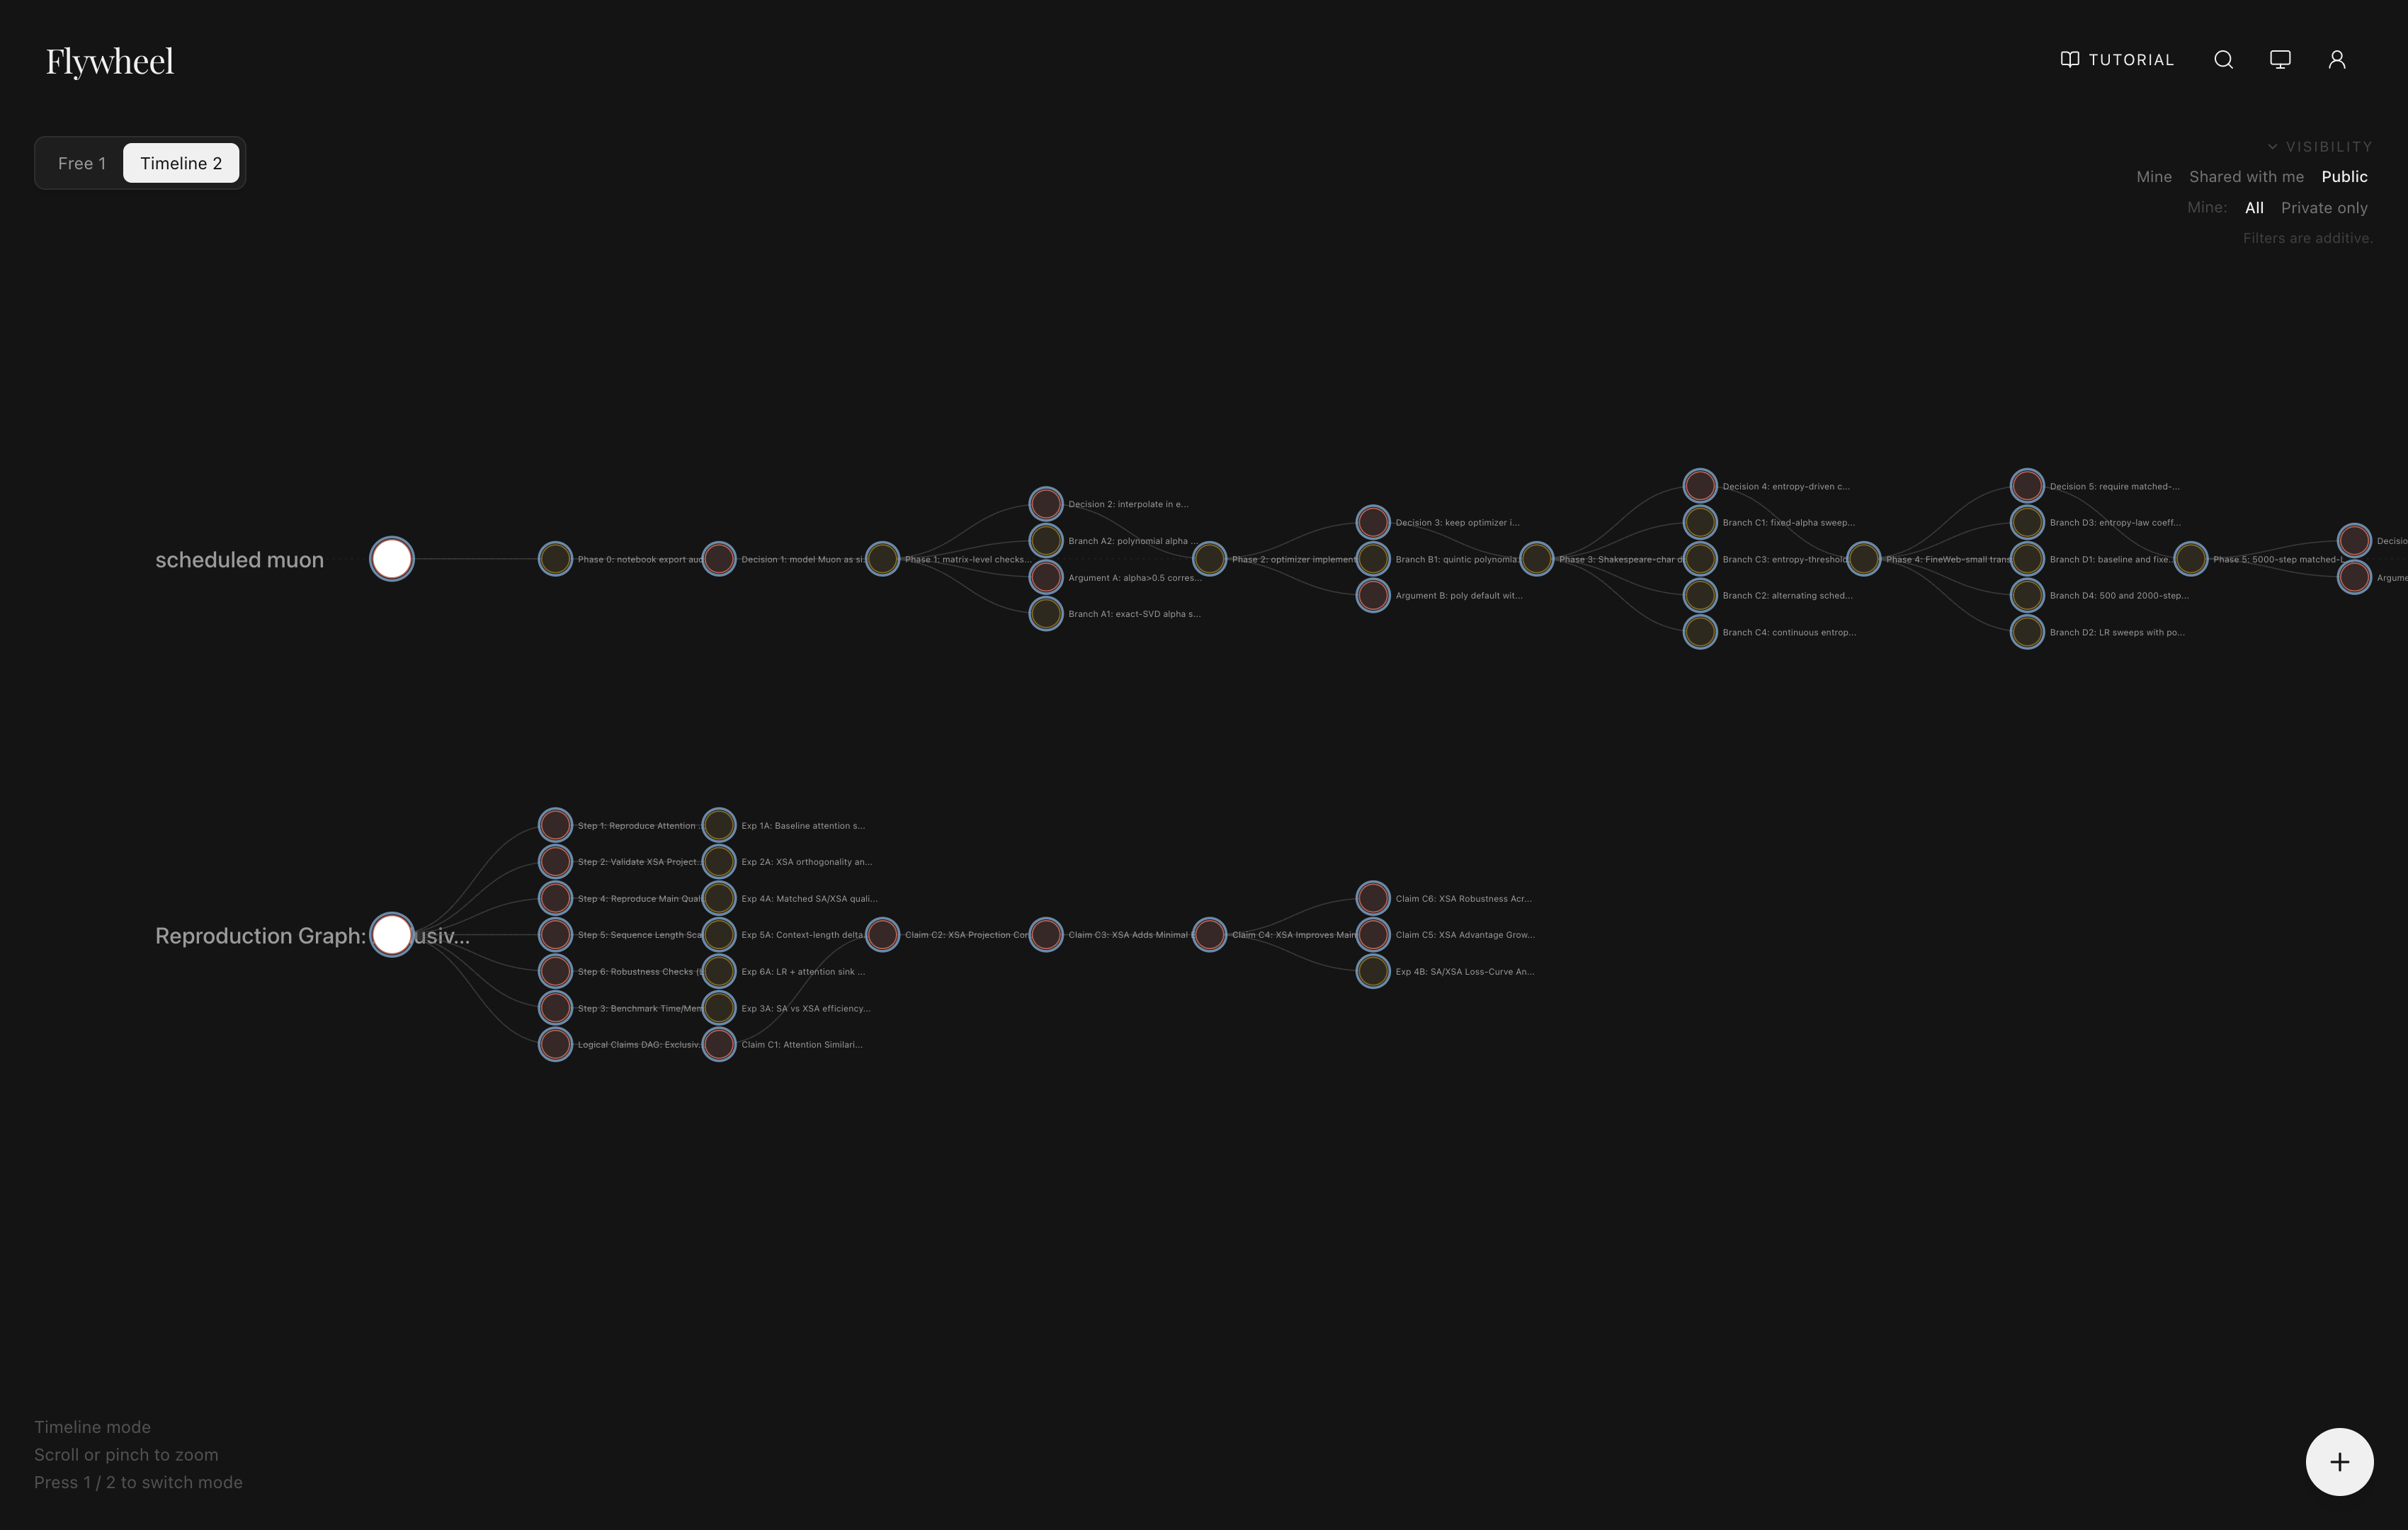
You can also shift select some nodes and generate summaries of their content and or export them as PDFs and/or JSON files for others to import. Of course, you can also use your MCP host to generate summaries and overviews of your research graph.
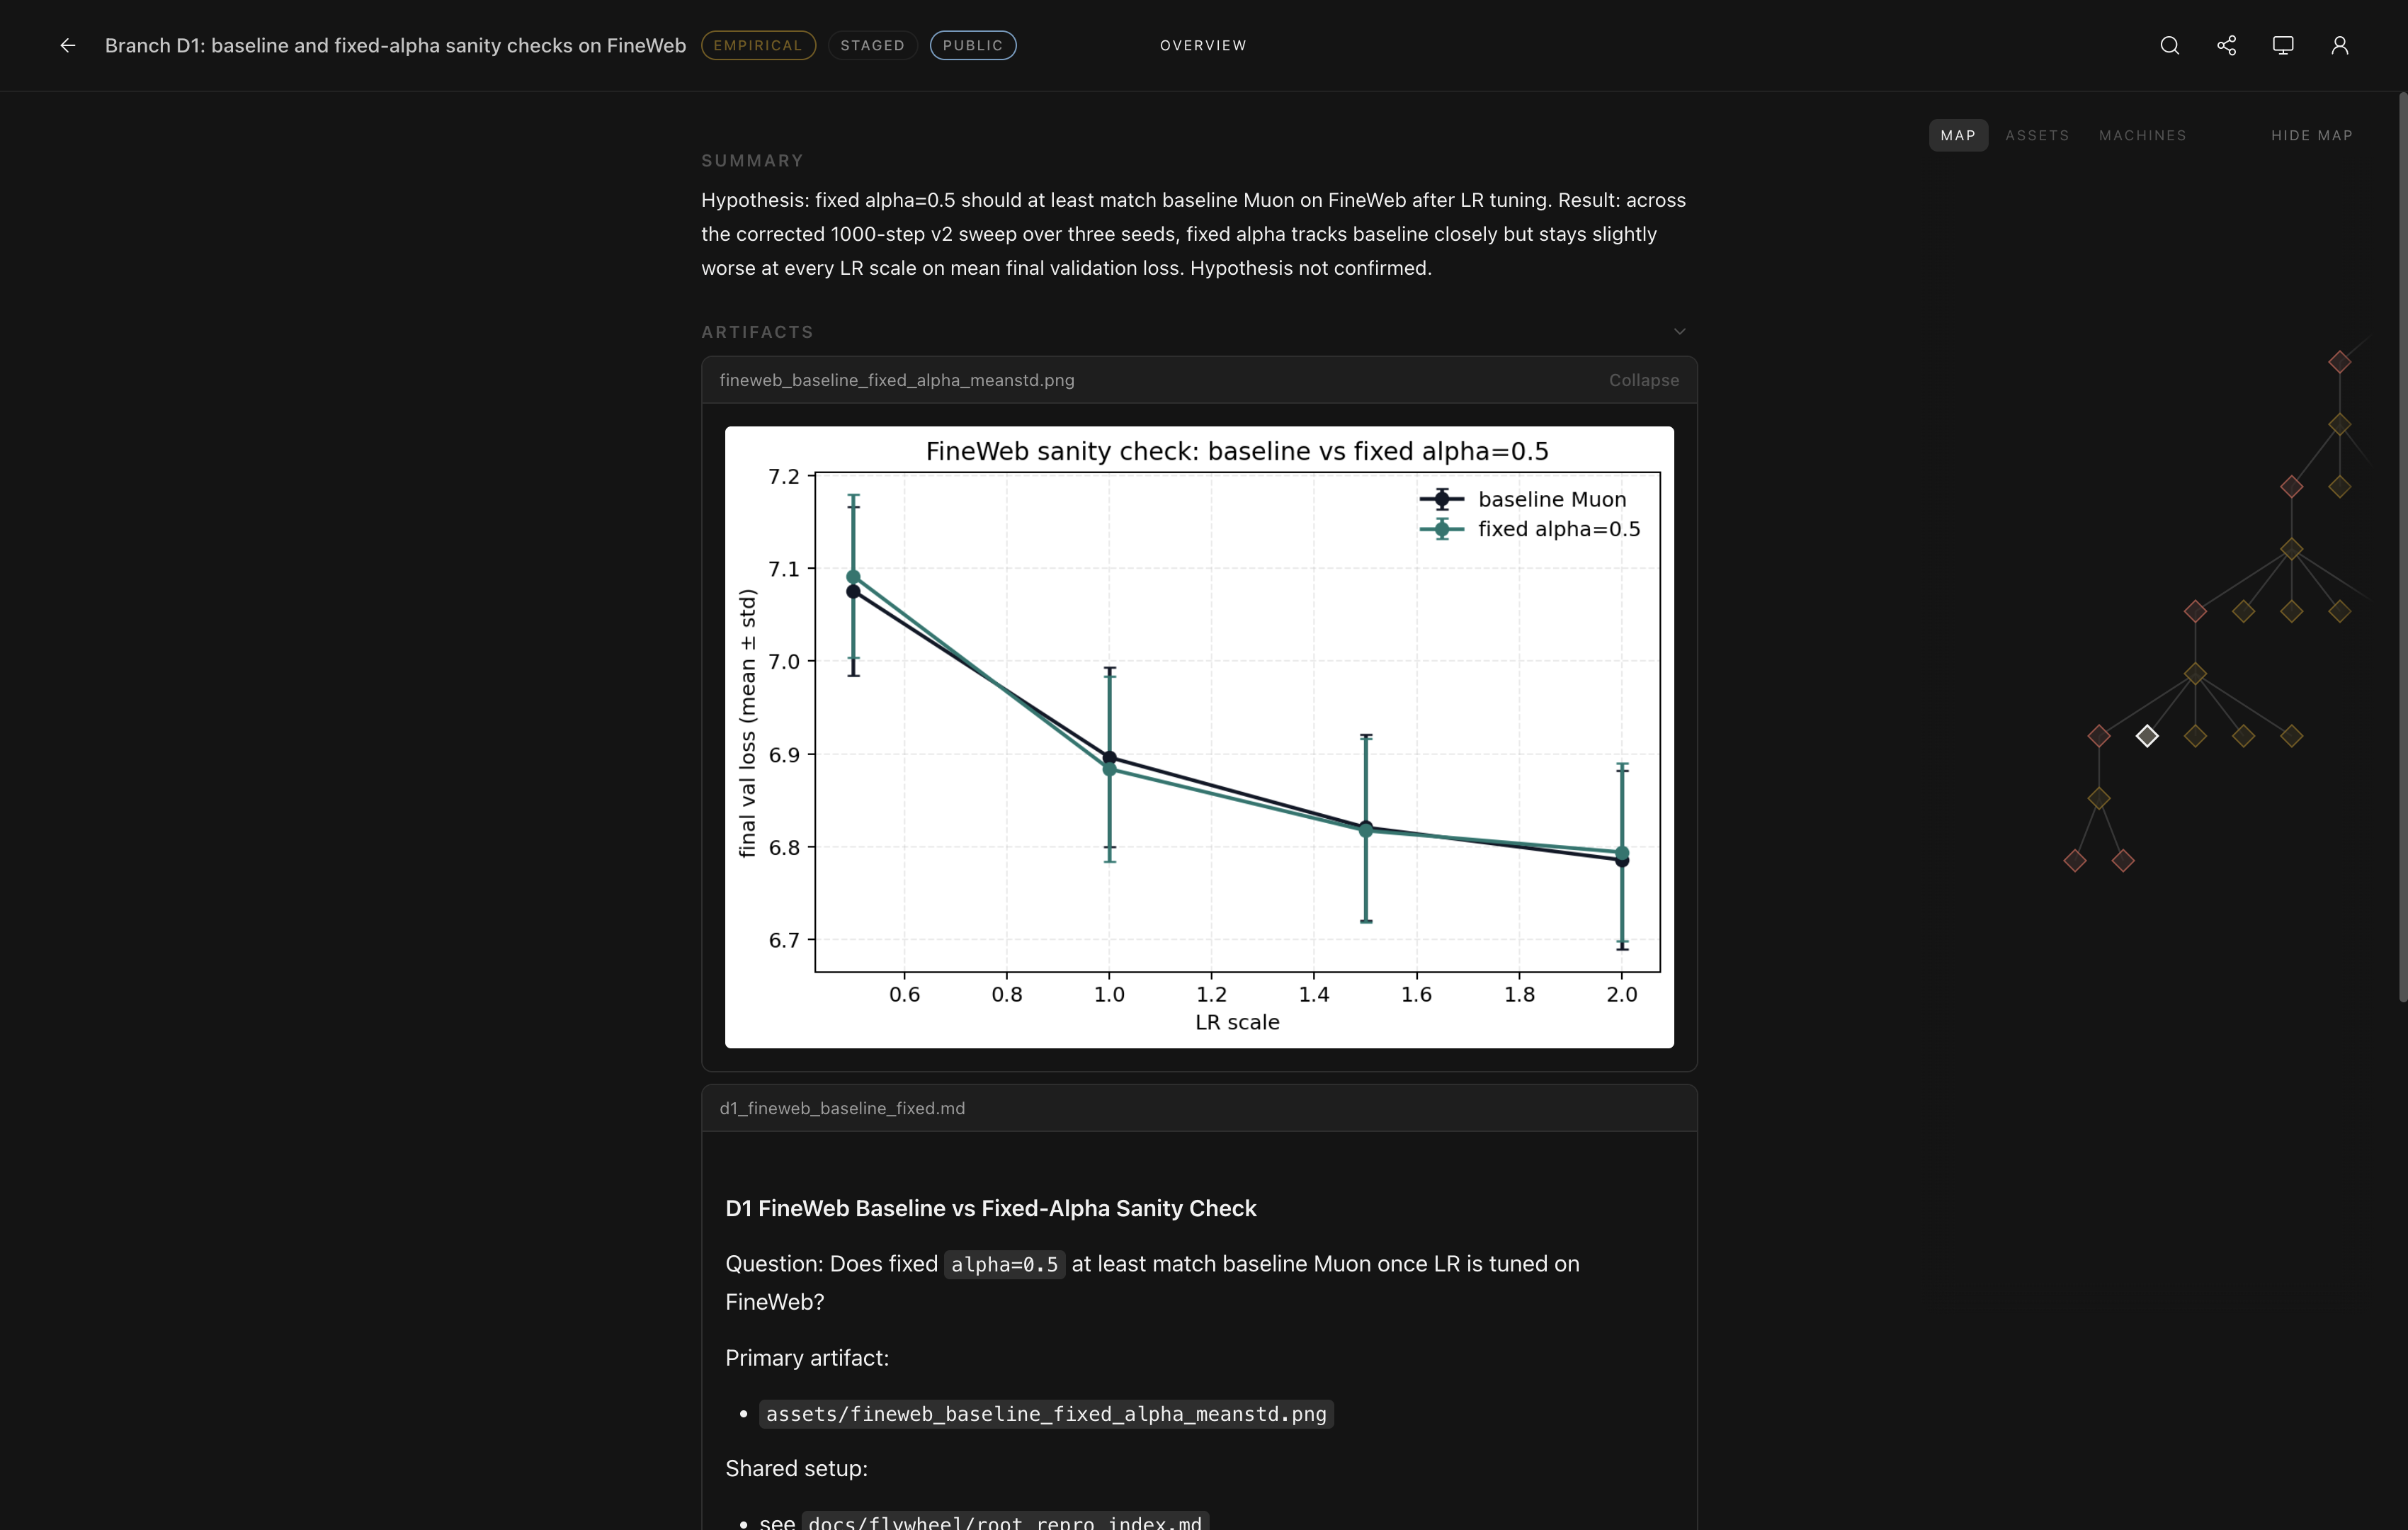
Inside a node, you will be able to see its content, summary, tags, and attached artifacts.
Hooks (Automations on Events)
Flywheel Hooks let you automate actions when node events happen. For the full workflow guide, see Hooks And Automations.
- An event is a durable "something happened" record. Supported events are
artifact.finalizedafter artifact finalize writes succeed andnode.publishedafter an eligible submission node becomes public. - A hook is a durable rule on a node that says: when event X happens in scope Y, perform action Z.
- A run is one execution record for one hook reacting to one event.
You can configure hooks in two ways:
- In the Web UI, open a node and use the Hooks panel in the right-side node panel area.
- In MCP, use the hook tools directly:
flywheel_create_hook,flywheel_update_hook,flywheel_set_hook_enabled,flywheel_delete_hook,flywheel_list_hooksflywheel_create_hook_secret,flywheel_update_hook_secret,flywheel_delete_hook_secret,flywheel_list_hook_secretsflywheel_list_hook_runs
Recommended setup flow:
- Create hook secrets (if your endpoint needs auth).
- Create a hook whose
workflow_yaml.ondeclares one or more supported events, a scope (self,subtree, orgraph), and a workflow that defines your action steps. - Set
workflow_yaml.ifto target the event shape you care about. - Enable the hook.
- Finalize an artifact upload and inspect run history with
flywheel_list_hook_runs.
workflow_yaml.if supports deterministic operators:
all,any,not,event,any_artifact- predicate operators:
eq,in,exists
Example: trigger when at least one public attempt submission artifact is finalized or when an eligible existing submission artifact becomes public with the node:
on:
  artifact.finalized: {}
  node.published: {}
if:
  all:
    - any:
        - event:
            field: event_type
            eq: artifact.finalized
        - event:
            field: event_type
            eq: node.published
    - any_artifact:
        field: metadata.campaign_role
        eq: submission
jobs:
  main:
    steps:
      - id: notify
        uses: flywheel/http_request@v1
        with:
          url: https://example.invalid/flywheel-hooks/artifact-finalized
"None artifact matches" is expressed with not: { any_artifact: ... }, for
example:
if:
  not:
    any_artifact:
      field: metadata.campaign_role
      eq: submission
Run cardinality is fixed: workflow-if evaluation yields one boolean per hook/event
and enqueues at most one run per (hook_id, event_id) (no artifact fanout).
Campaign submission artifacts follow the campaign's submission visibility
policy. Current public-policy campaigns require the attempt node to be public
before finalizing an artifact with metadata.campaign_role = "submission".
Invalid non-public submissions fail during artifact finalization before
submission hooks run.
Workflow steps currently support:
flywheel/http_request@v1flywheel/http_poll@v1flywheel/json_extract@v1flywheel/load_artifact@v1flywheel/upsert_artifact@v1flywheel/add_node_tags@v1
flywheel/upsert_artifact@v1 uses with.match to select the artifact to update.
Use match.metadata for subset matching and keep selectors unique; ambiguous
selectors fail terminally. Campaign workflows should keep contestant-authored
submission artifacts (campaign_role=submission) on the attempt node, then
write root-owned evaluation artifacts (campaign_role=evaluation) onto the
campaign root.
flywheel/add_node_tags@v1 adds ordinary root graph tags to a target node while
preserving existing tag assignments. It rejects one-only tags in v1.
Managed Compute
Flywheel can provision managed GPU instances for you from providers like Lambda Labs, Modal, Vast.ai, Prime Intellect, Nebius, and RunPod — directly from your agent conversation. You don't need to leave your workflow to spin up machines.
How it works
-
Ask your agent for compute. When you need a GPU for an experiment, just say so:
$ codex "I need a GPU to train a small transformer on this dataset" I'll provision a GPU for this node. First, I need you to approve a budget. Opening the approval page now... -
Approve a budget. Flywheel opens an approval page in your browser where you set a spending cap for managed compute acquisition.
-
The agent handles the rest. It acquires a machine, waits for it to become ready, and gets SSH access automatically. Provisioning typically takes a few minutes — the agent polls for readiness in the background.
-
Release when done. When you're finished, the agent releases the lease. You can also release leases from the Web UI at any time.
Managing machines in the Web UI
In Settings > Machines, you can see all GPU leases across your account — including the provider, state, hourly rate, total spend, and the acquire context that originally launched each lease. You can release individual leases or all at once.
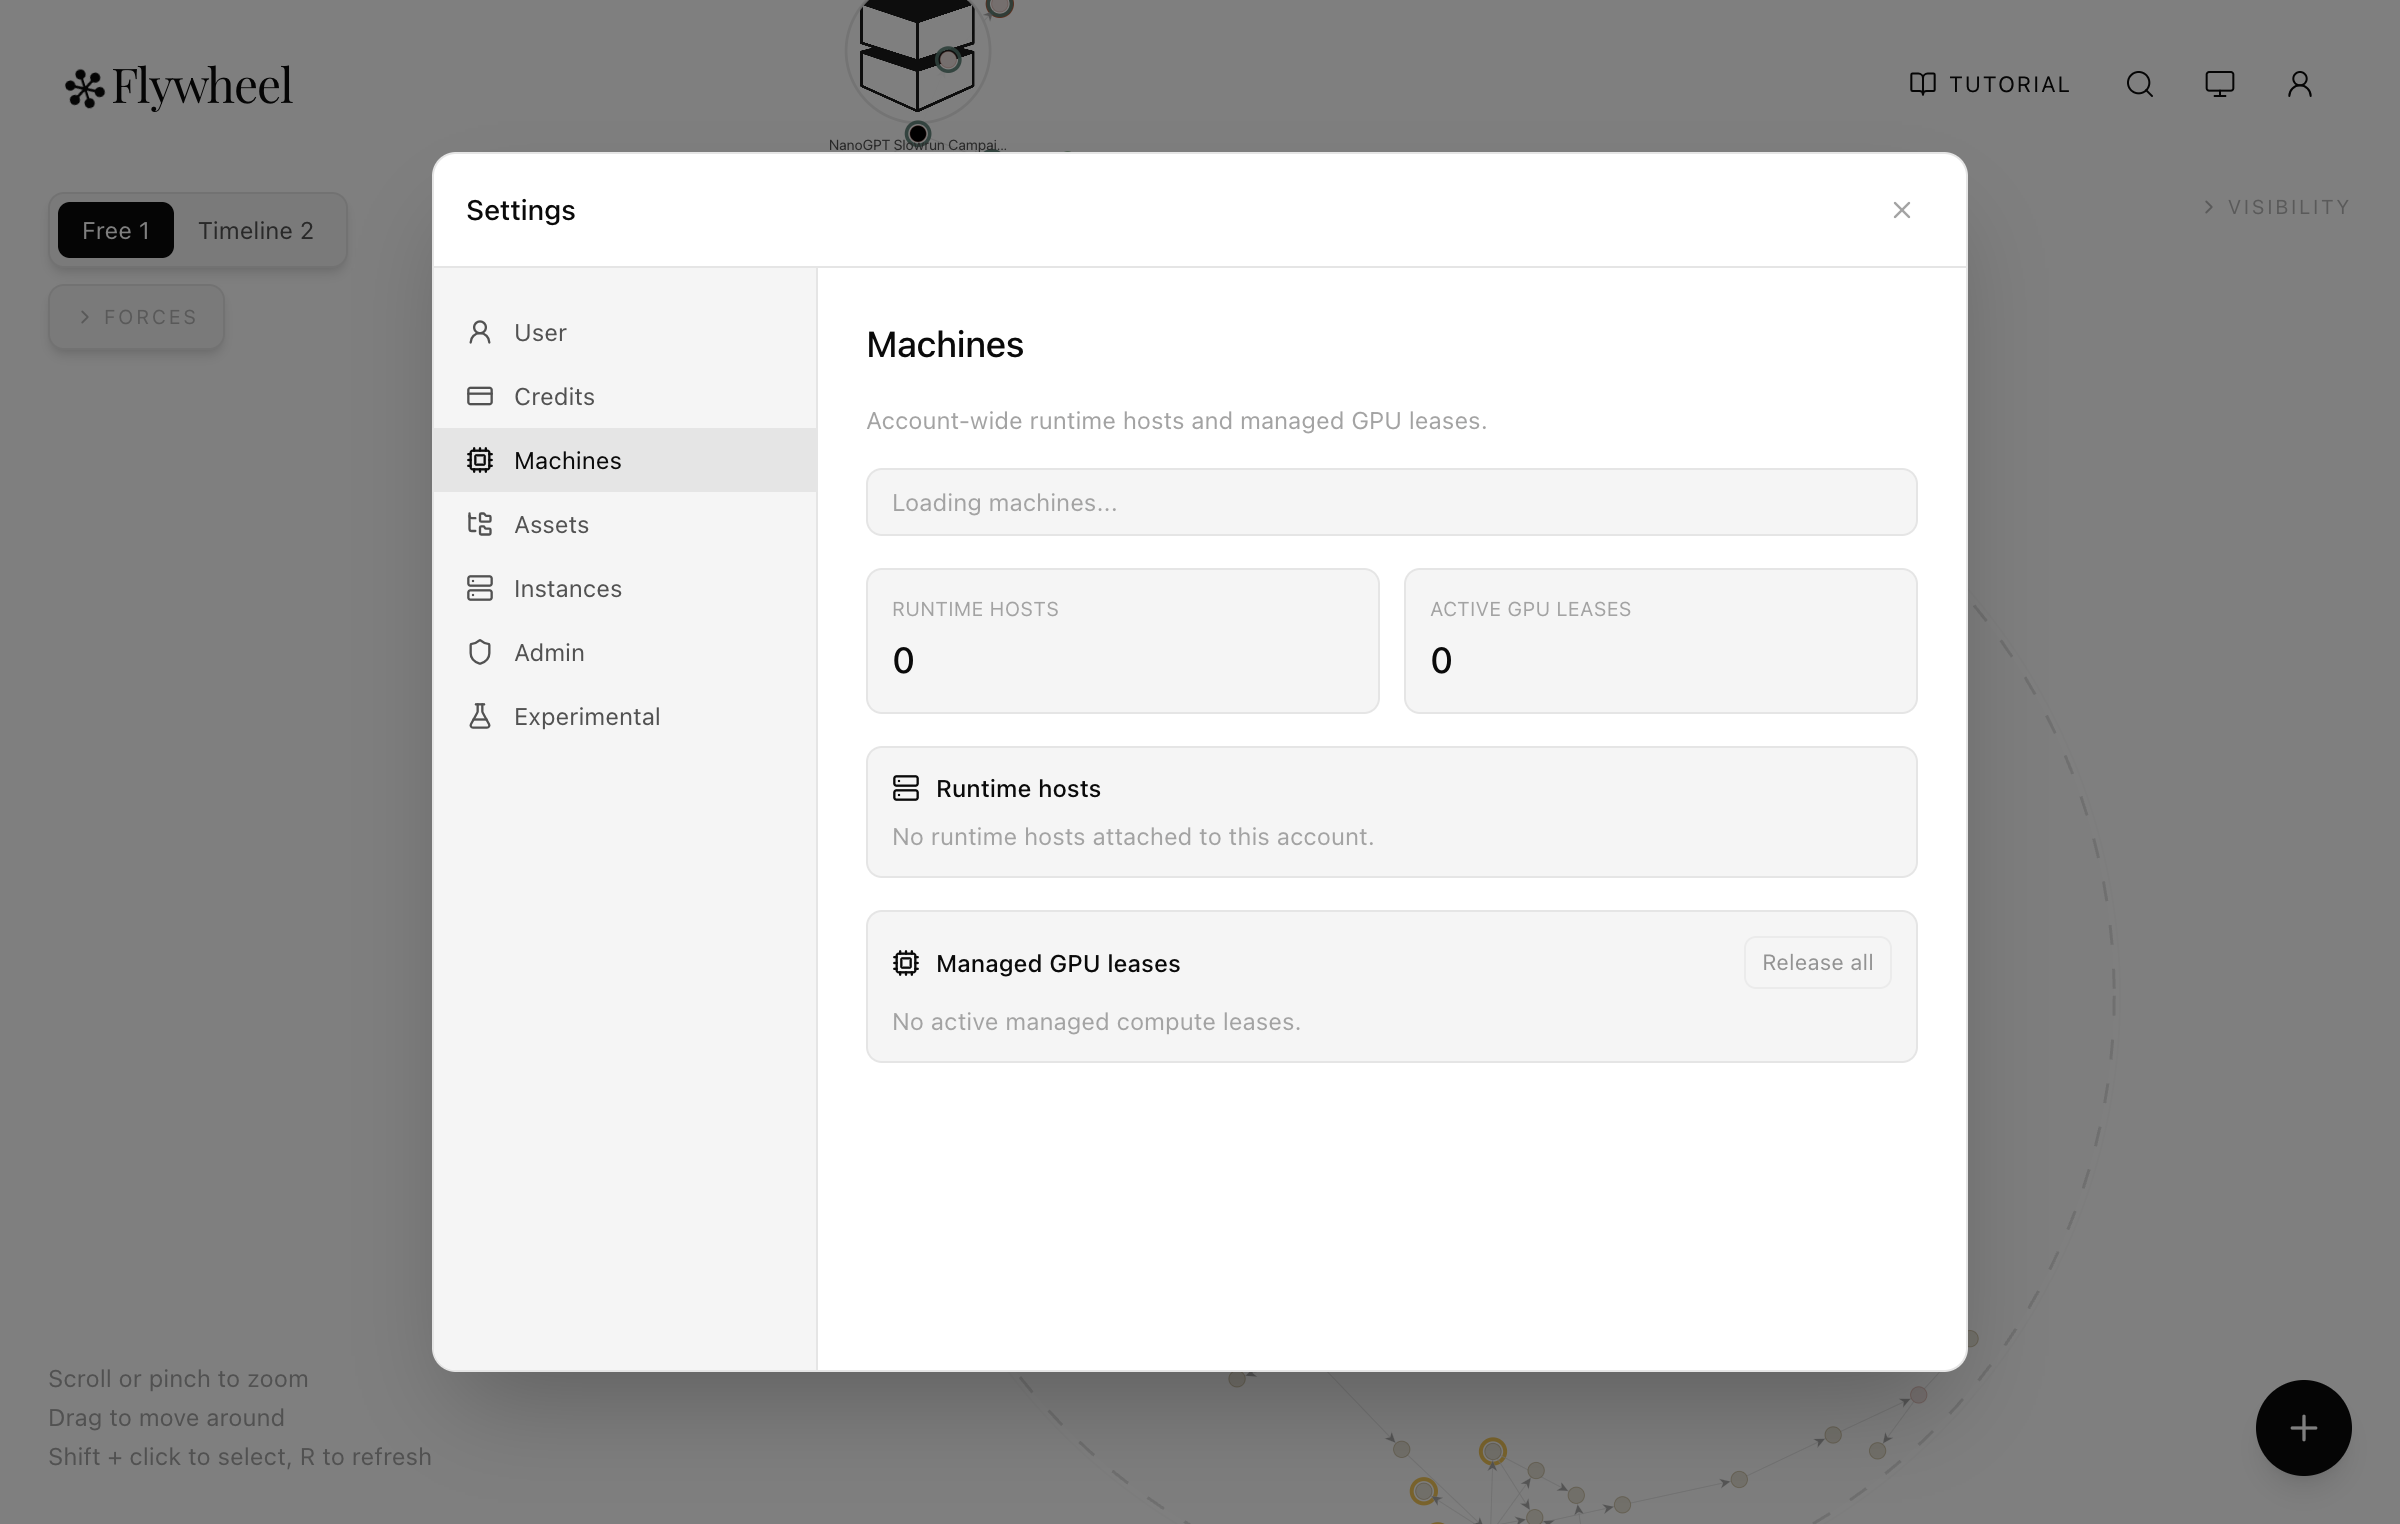
Inside a node, the node view focuses on compute policy and budget tracking (spent vs. hard cap). Active machines themselves are managed from the account level Settings > Machines view.
Credits and billing
Compute is billed against your Flywheel credits balance, which is separate from your subscription.
- The Pro subscription ($20/month or $204/year) includes $10 in non-rollover credits each Pro cycle. Those credits refresh when the plan renews, while separately purchased credits do not expire.
- During beta, Pro (Beta) users receive the same Pro-cycle credit allowance without billing while beta access remains active.
- You can check your balance in Settings > Credits.
- Before any compute is provisioned, you approve a spending cap — no surprises.
- User budgets fund your own managed compute usage. Campaign organizers can also fund participant compute through root-backed campaign budgets (more on this in the next section).
Tips
- Provisioning takes a few minutes — the agent polls automatically, so you don't need to babysit it.
- You can walk away; Flywheel continues while the machine spins up.
- Release leases when you're done to save credits.
Integrations
Flywheel can hold credentials for external tools so machines launched by your agent can pull artifacts from and push logs to your own accounts. Manage these from Settings > Integrations in the Web UI, or from the CLI:
- Weights & Biases — store a W&B API key so executions can stream metrics
to your W&B project:
flywheel integrations:wandb:set. - Hugging Face — store an HF access token so executions can pull gated
models or push checkpoints:
flywheel integrations:huggingface:set. - GitHub — link a GitHub installation so Flywheel can resolve repos for
node workspaces and executions:
flywheel github:link.
Use flywheel integrations:status (and flywheel github:status) to see which
integrations are currently connected, and the matching :remove /
github:disconnect commands to revoke them. For the full integrations command
list, see the CLI reference.
Participating in a Campaign
Campaigns are challenge-style Flywheel graphs where an organizer shares a root graph, defines the objective and submission contract, and may fund participant compute through campaign budgets.
To participate in a campaign:
- Get access to the campaign root. Invite-only campaigns are shared directly with your Flywheel account. Open campaigns are made public by the organizer.
- Open the campaign in the Web UI or ask your MCP host to inspect the root node.
- Read the campaign root carefully before you start. Organizers can define the objective, submission format, graph hygiene, repo policy, GPU guidance, and any evaluation rules directly on the root.
- Do your work in your own part of the graph. Use Flywheel nodes to record your progress, artifacts, summaries, and conclusions so your submission stays reviewable. When the campaign asks for a canonical submission artifact, write that artifact on your own attempt node and follow the campaign visibility policy before finalizing it. Organizer hooks can evaluate valid submissions and refresh leaderboard artifacts on the campaign root without writing back onto your node.
- If the campaign provides compute funding, discover the available campaign
budgets, request approval, then acquire compute against the returned session
compute_grant_id.
The practical rule is simple: the campaign root tells you the contract, and your graph is how you show your work.
Once a valid submission artifact is finalized, Flywheel creates a lifecycle
record for it. Agents should query that record instead of inferring status from
hook rows or external scoreboards: use
flywheel_get_artifact_campaign_submission for a known node/artifact pair,
flywheel_list_node_campaign_submissions for an attempt node, or
flywheel_get_campaign_submission for a known submission id. Invalid
submissions fail immediately with 422 and do not create a lifecycle record.
forwarded means Flywheel handed the submission to campaign automation; the
terminal states are scored, rejected, and failed.
Coming Soon
- A dedicated tutorial section for setting up a campaign as an organizer.
- A dedicated tutorial section for sponsoring or funding a campaign.
FAQ: How Do I Migrate from the Previous OAuth-Based MCP Client Setup?
If you installed Flywheel MCP before April 2026, migrate to the newer, more stable API key authentication setup with:
curl -fsSL https://flywheel.paradigma.inc/uninstall | sh
curl -fsSL https://flywheel.paradigma.inc/install | sh -s -- --mode mcp
If your previous install used a server name different from flywheel, pass
--name <old-name> to uninstall that specific entry.
If you prefer the canonical CLI install instead of recreating MCP host entries, omit the setup arguments on reinstall:
curl -fsSL https://flywheel.paradigma.inc/install | shFAQ: Setup Fails On Remote SSH Machines With localhost / 127.0.0.1 Redirect Errors
When setup runs on a remote machine, localhost callback URLs resolve on that remote machine, not on your laptop browser. Use device auth:
npx --yes @paradigma-inc/flywheel setup \
  --mode mcp \
  --auth-mode device \
  --base-url https://flywheel.paradigma.inc
--auth-mode device prints an approval URL and setup code; approve in browser
and the CLI polls until your API key is issued.
FAQ: My MCP Host Is Not Supported by the Setup Wizard. How Do I Install Flywheel?
If your host is not currently supported by
npx --yes @paradigma-inc/flywheel setup --mode mcp, you can still connect
manually.
- In the Flywheel Web UI, open Settings, go to the User tab, expand MCP API keys, and click Create key.
- Copy the key immediately (it is shown once).
- Add a Flywheel MCP server entry in your host config with:
- URL:
https://flywheel.paradigma.inc/mcp-server - Header:
Authorization: Bearer <YOUR_MCP_API_KEY>
- URL:
Example JSON-style host config:
{
  "mcpServers": {
    "flywheel": {
      "type": "http",
      "url": "https://flywheel.paradigma.inc/mcp-server",
      "headers": {
        "Authorization": "Bearer <YOUR_MCP_API_KEY>"
      }
    }
  }
}
Example TOML-style host config:
[mcp_servers.flywheel]
type = "http"
url = "https://flywheel.paradigma.inc/mcp-server"

[mcp_servers.flywheel.headers]
Authorization = "Bearer <YOUR_MCP_API_KEY>"
Different hosts use different field names (mcpServers, mcp_servers,
mcp.servers, etc.), but the server URL and Authorization bearer header are
the key pieces.
Alternative: for any host that supports MCP OAuth, you can use its OAuth
connector install flow and set the MCP URL to
https://flywheel.paradigma.inc/mcp-server. Web connector hosts (for example
ChatGPT.com, Claude.ai) commonly use this path. It can be convenient, but it
may prompt re-authorization more often than the API key route depending on the
host token lifecycle and refresh behavior.
FAQ: How Can I Get an Authorized client_id for the OAuth Flow?
We support the standard MCP OAuth flow with dynamic client registration, as documented in the MCP Authorization spec (dynamic client registration).
First, query our OAuth authorization-server metadata:
curl -sS https://flywheel.paradigma.inc/mcp-server/.well-known/oauth-authorization-server | jqThat response includes the OAuth endpoints (authorization_endpoint,
token_endpoint, registration_endpoint, and others).
response_types_supported is currently ["code"], so register with
"response_types":["code"].
Then register your OAuth client using the registration_endpoint.
Public client (default)
This is the default for interactive MCP hosts (for example Claude Code, IDE
hosts, local desktop clients). If token_endpoint_auth_method is omitted, we
default to none.
curl -sS -X POST https://flywheel.paradigma.inc/mcp-server/register \
  -H "content-type: application/json" \
  -d '{
    "client_name":"Flywheel MCP Host",
    "redirect_uris":["http://localhost:3333/callback"],
    "grant_types":["authorization_code","refresh_token"],
    "response_types":["code"]
  }' | jq
The response returns a client_id and no client_secret.
Confidential client (optional)
Use this when your app has a trusted backend that can securely store secrets.
curl -sS -X POST https://flywheel.paradigma.inc/mcp-server/register \
  -H "content-type: application/json" \
  -d '{
    "client_name":"Flywheel MCP Connector Backend",
    "redirect_uris":["https://YOUR_CALLBACK_URL"],
    "grant_types":["authorization_code","refresh_token"],
    "response_types":["code"],
    "token_endpoint_auth_method":"client_secret_post"
  }' | jq
That response returns both client_id and client_secret. Keep
client_secret private in your backend.